Maintain Your Colorado Kitchen Plumbing
A functioning kitchen sink sprayer is essential for kitchen tasks, from washing dishes to rinsing off produce. However, leaks can arise, causing a hassle and potential water damage.
Our team is here to guide you through the steps to fix a leaky faucet hose — specifically focusing on the flexible hose of your kitchen sink sprayer. Whether you’re dealing with a leak or looking to maintain your sprayer, these detailed instructions from Garvin’s Plumbing and Sewer will help keep your kitchen in top shape.
Kitchen Faucet Hose Leak: Identifying The Problem
The first step in addressing an issue is accurately identifying the problem. Common signs of a kitchen faucet hose leak include:
- Water dripping from the hose — If you notice water dripping from the hose even when the sprayer is not in use, there’s likely a leak.
- Decreased water pressure — A sudden drop in water pressure can indicate water loss.
- Visible damage or wear on the flexible hose — Inspect the hose for any cracks, holes or signs of wear and tear.
By recognizing these signs early, you can prevent further damage and ensure your kitchen sink sprayer functions smoothly. Proper identification is crucial for effective and timely repairs.
Tools Needed For Inspection And Repair
Identifying troubles with your sink sprayer hose is crucial for maintaining its efficiency. If you notice issues, it’s crucial to take action and rectify the underlying problem.
To inspect and repair your kitchen sink sprayer hose, you’ll need a few essential tools:
- Adjustable wrench — For loosening and tightening nuts and bolts.
- Pliers — Useful for gripping and maneuvering tight spaces.
- Screwdriver — Needed to remove screws or fasteners securing components.
- Replacement parts (if necessary) — Have new hoses, washers or connectors on hand for immediate replacement if damage is identified during inspection.
If you’re interested in performing your own repair, read on to learn the step-by-step process. However, if you’re more comfortable putting your plumbing in professional hands, reach out to our team to schedule your kitchen plumbing repair.

Preparing For The Sink Sprayer Repair
Before you begin the repair process, it’s crucial to ensure safety and prepare your workspace. First, locate the shutoff valves under the sink and turn them clockwise to stop the water flow.
This step prevents water from flooding your kitchen during the repair. Clear the area under the sink to create an open workspace and easy access to the plumbing components.
Inspecting The Flexible Hose
Next, you’ll need to inspect the flexible hose kitchen sink sprayer for damage. To conduct an inspection, follow these steps:
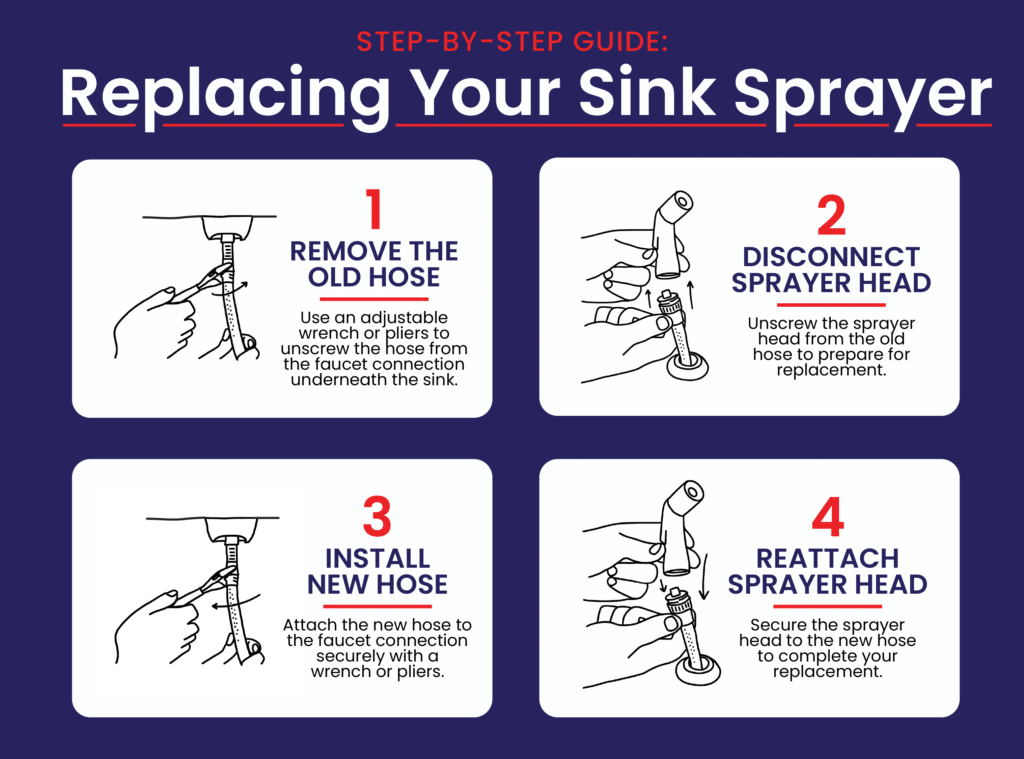
- Detach the sprayer head from the hose — Unscrew the sprayer head from the hose to examine it closely.
- Check for visible signs of damage on the flexible hose — Look for cracks, holes or worn-out areas along the hose.
- Determine if the issue is with the hose, sprayer head or connections — Identifying the exact source of the leak will guide your repair efforts.
For assistance with this process, turn to Garvin’s for professional inspection and service!
How To Fix A Leaky Faucet Hose
Depending on the source of the leak, the repair process will vary. You may need to remove and replace a damaged hose or tighten the connections.
What To Do If The Hose Is Damaged
To remove a faulty hose, follow these steps:
- Unscrew the hose from the faucet connection using an adjustable wrench or pliers.
- Remove any retaining clips or fasteners holding the hose in place.
Once the hose is removed, you’ll need to install the replacement fixture.
Here’s how to assemble the new flexible hose:
- Attach the new hose to the faucet connection, ensuring a secure fit.
- Secure the hose with clips or fasteners as needed.
- Reattach the sprayer head to the new hose.
What To Do If The Connections Are Leaking
Use a wrench or pliers to tighten loose connections where the hose attaches to the faucet or sprayer head. Wrap plumber’s tape around the threads of the connections to create a tighter seal and prevent future leaks.
Testing The Repair
Once the repair is complete, test the sprayer to ensure the leak is fixed. Slowly turn the shutoff valves counterclockwise to restore water flow.
Run water through the sprayer to ensure it’s not leaking at the connections or along the hose.
Verify the water pressure and functionality of the sprayer. Turn the fixture on completely to ensure the sprayer operates at the expected pressure and without any issues.
Additional Tips And Maintenance
Regular maintenance can help prevent future leaks and prolong the life of your kitchen sink sprayer. To ensure your DIY repair lasts for as long as possible, regularly check the connections and hose for wear and tear. This periodic inspection prevents potential issues from worsening.
Additionally, avoid twisting or bending the hose excessively. Periodically tighten connections as needed to prevent water loss from the fixture.
Wrap Up Your Kitchen Plumbing Repair With Garvin’s
Fixing a leaky faucet hose doesn’t have to be a daunting task. By following these steps, you can address a kitchen faucet hose leak and restore the functionality of your flexible hose kitchen sink sprayer.
Remember, regular maintenance and timely repairs can prevent minor issues from becoming major problems. If you encounter any difficulties or prefer professional assistance, Garvin’s Plumbing and Sewer is here to help.
If you’re ready to experience the difference that decades of expertise can make, schedule an appointment with our team today. Let us help you maintain the integrity and functionality of your home’s plumbing system!

Set Your Garvin's Plumbing Location
Broomfield, CO
Broomfield, CO 80020
Englewood, CO
Englewood, CO 80110


